Step 2: Configure the insertion rules and options
By default, there is an option into the preference that will run the scheduled transactions insertion every time you open your HomeBank file, each transaction will be inserted under some condition:
- the due date is reached according the rules below
- the account is not empty
- the amount is not equal to 0
Those last two option enables you to manage the variable scheduled transactions, for amount variation for example. They will not be posted automatically, and no edit popup will shows during the Post pending scheduled transactions at program start, what would be confusing with no context or window behind.
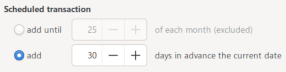
You also have more control and can post transaction in advance with preference of the file properties dialog with 2 options:
- Add until xx of each month (excluded)
set this to until 25 of each month, will not post until we get over that date (so starting the 26th)
- Add x days in advance the current date
set this to 30 days in advance, rely that the day is over (so current day is excluded)
To insert transaction to their due date again, insert 0 days in advance the current date. You can also reach this configuration dialog from the main-window menu Transaction/Set scheduler...
At last, you are able to trigger the insertion from the main-window menu Transaction/Process scheduled...
Step 3: Control the scheduled transactions
In the main window, a list of scheduled transaction can be displayed, it's a summary of every pending scheduled transaction post.
You can control the transaction post or skip it, if required, from here directly with some toolbar buttons below the list.
If a scheduled transaction is late, you will see a warning icon with the number of post late in a maximum of 10. If the overdue is more than 10 posts, it will shows +10.

A filter enables to restrict the view to :
- This/Next month
- Next 30, 60, 90 days
- All
 Note that Late transactions are ALWAYS showed
